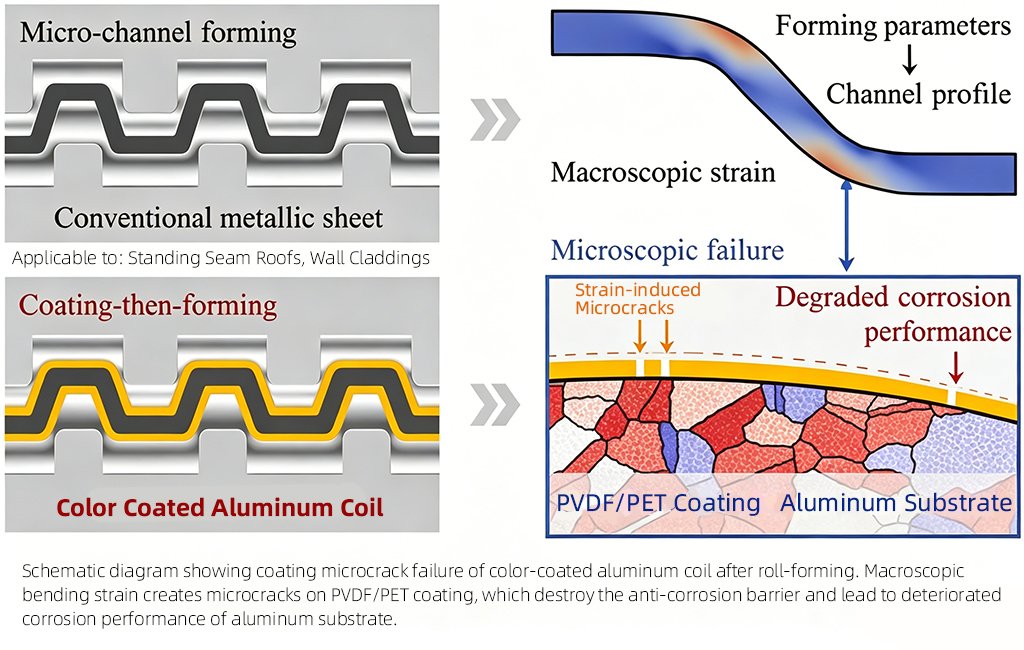


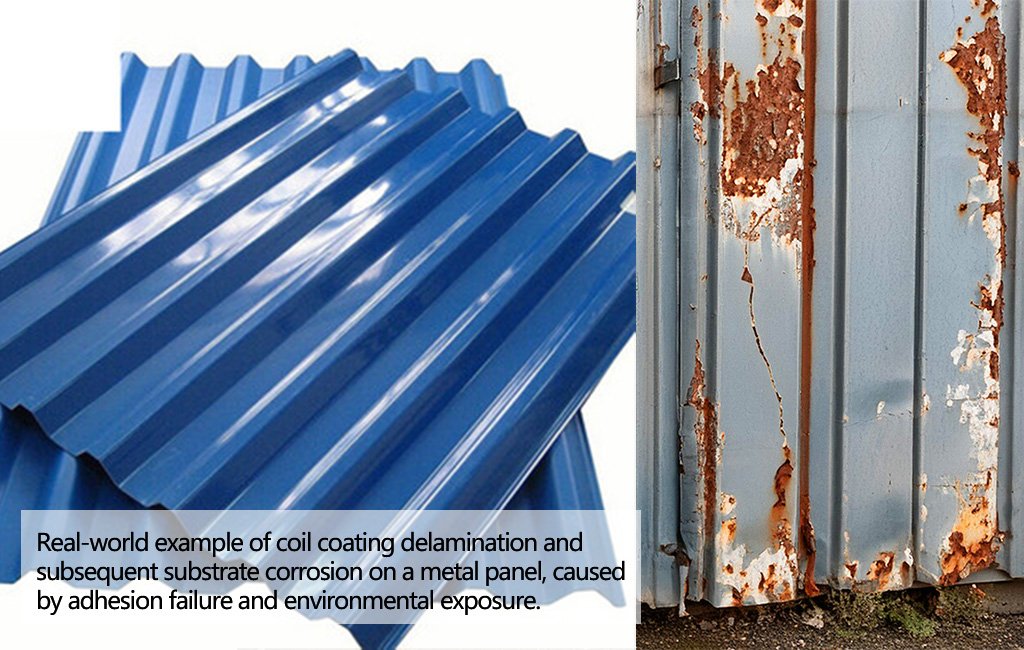
Coil coating delamination occurs when the coating layers separate from the metal substrate or between coating layers (e.g., primer–topcoat) in coil-coated metal (commonly aluminum or steel).
Root causes include insufficient surface preparation, improper pretreatment, incompatible coating systems, inadequate cure, moisture entrapment, and mechanical damage during handling or bending.
Environmental exposure (UV, heat, humidity) and substrate mismatch in thermal expansion can also drive interfacial separation.
Prevention requires stringent pretreatment, validated adhesion between primer and topcoat, correct curing, controlled storage, careful handling, and installation practices that avoid coating trauma.
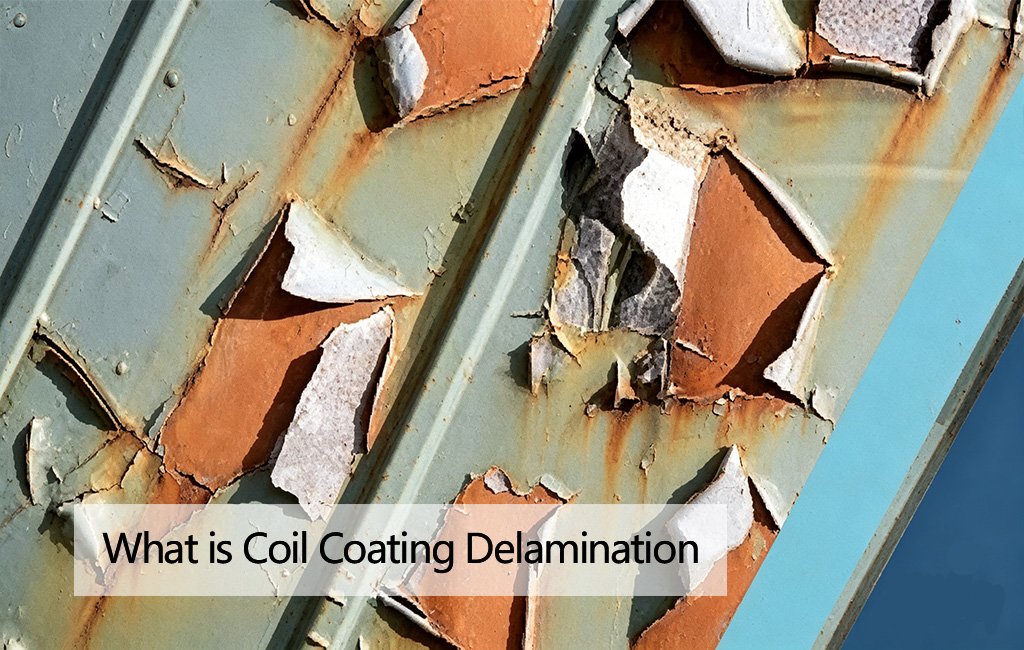
Definition, scope, and terminology Coil coating delamination: separation of coating layers from the substrate or between layers (primer–topcoat) in continuously coated metal coils.
Substrates: aluminum or steel coils; coating systems typically include pretreatment, primer, and topcoat.
Failure modes: interfacial debonding, blistering, cohesive cracking, or delamination under thermal/mechanical stress.
Primary causes and mechanisms
Surface energy and cleanliness failure: inadequate cleaning leaves organics or metals that impede adhesion.
Pretreatment layout errors: incorrect or inconsistent conversion coating or phosphate layers reduce bonding.
System incompatibility: primer/topcoat mismatch or inappropriate adhesion promoters compromise the interfacial bond.
Insufficient cure: under-baked films retain reactive moieties that drive later debonding.
Moisture and volatiles: entrapped moisture expands during heating and causes blistering/delamination.
Mechanical overstress: sharp edges, improper lay-up, or bending beyond the coating’s bend radius causes microcracks that propagate.
Thermal expansion mismatch: differential expansion between coating and substrate under temperature cycling.
UV/chemical attack: degraded topcoats expose underlayers to environmental attack, weakening adhesion.
Prevention during manufacturing (coil coating line)
Substrate prep: implement ISO 8501-compliant cleaning; remove oils, fingerprints, and oxides before coating.
Pretreatment control: use validated conversion coatings or primers compatible with the topcoat; monitor bath chemistry and temperature.
System compatibility: select primer/topcoat pairs per manufacturer data sheets; perform compatibility testing on representative coils.
Cure verification: calibrate ovens, monitor peak temperature, and ensure dwell time meets the system spec.
Film thickness control: target precise dry film thickness (DFT) per system; use in-line dry film/thickness gauges.
Contamination control: segregate coatings by batch; control dust, humidity, and VOCs in the coating area.
Handling and lay-up: use edge protectors; avoid contact with sharp armor or burrs; ensure smooth winding to prevent crease damage.
In-line testing: perform adhesion tests (ISO 2409 / ASTM D3359) on representative coils; conduct periodic cross-cut checks.
Storage conditions: store coated coils in controlled environments to prevent moisture uptake and condensation.
Prevention during installation and service
Storage and transport: keep coils in dry, covered environments; avoid exposure to direct sunlight and temperature extremes before installation.
Surface preparation on site: do not abrade cured coatings; if repairs are needed, use approved touch-up processes with compatible products.
Handling practices: avoid dragging coils over rough surfaces; use protective rollers and proper cradles.
Forming and assembly: use tooling that maintains coating integrity; avoid excessive bending beyond the specified bend radius.
Field inspections: perform non-destructive inspections for coating integrity after forming or processing; document any micro-marks.
Environmental protection: shield coatings from chemicals or solvents that can degrade interlayer adhesion.
Repairs and warranty: follow approved repair procedures; maintain traceability for warranty and service life assessment.
Verification and testing (quality assurance)
Adhesion testing: pull-off (ISO 4624) or cross-cut (ISO 2409/ASTM D3359) after coating and post-forming steps.
Bend tests: mandrel or bend radius tests to ensure no cracks at typical service radii.
Curing verification: calorimetry or differential scanning to confirm crosslinking extent.
Weathering and chemical resistance: accelerated weathering (ISO 4892) and salt spray resistance (ISO 9227 / ASTM B117) as applicable.
Non-destructive inspection: visual, tape pull tests, and surface roughness assessments to detect early delamination indicators.
SOP / Checklist (Preventing Coil Coating Delamination)
1.Define substrate and coating system
Confirm coil material (Al or steel), pretreatment, primer, and topcoat per spec.
2.Validate surface preparation
Ensure cleaning, degreasing, and oxide removal meet standards (e.g., ISO 8501).
3.Verify pretreatment process
Confirm bath chemistry, pH, temperature, and coating line control are within spec.
4.Confirm coating compatibility
Use manufacturer data sheets; run compatibility tests on representative coils.
5.Calibrate cure process
Set oven temperature profile; verify with test coupons for adequate cure.
6.Control film thickness
Monitor DFT with in-line gauges; maintain within tolerance.
7.Inspect post-coating adhesion
Perform ISO 2409/ASTM D3359 adhesion tests on samples after cure.
8.Manage storage and handling
Store in dry, clean areas; protect edges; minimize mechanical impact during transport.
9.Document traceability
Record batch numbers, bath chemistries, cure data, and test results for QA and warranty.
10.Field installation QA
Inspect for coating damage after bending or forming; apply approved touch-up procedures if permitted.